How to Paint Orchid in Sumi-e: Leaves, Crossings, Flowers & Composition
Learn how to paint an orchid in sumi-e step by step — the single uninterrupted leaf stroke, the space where leaves cross, pale-ink flowers, and gathering the base. With a video demonstration by Tohun Kobayashi.
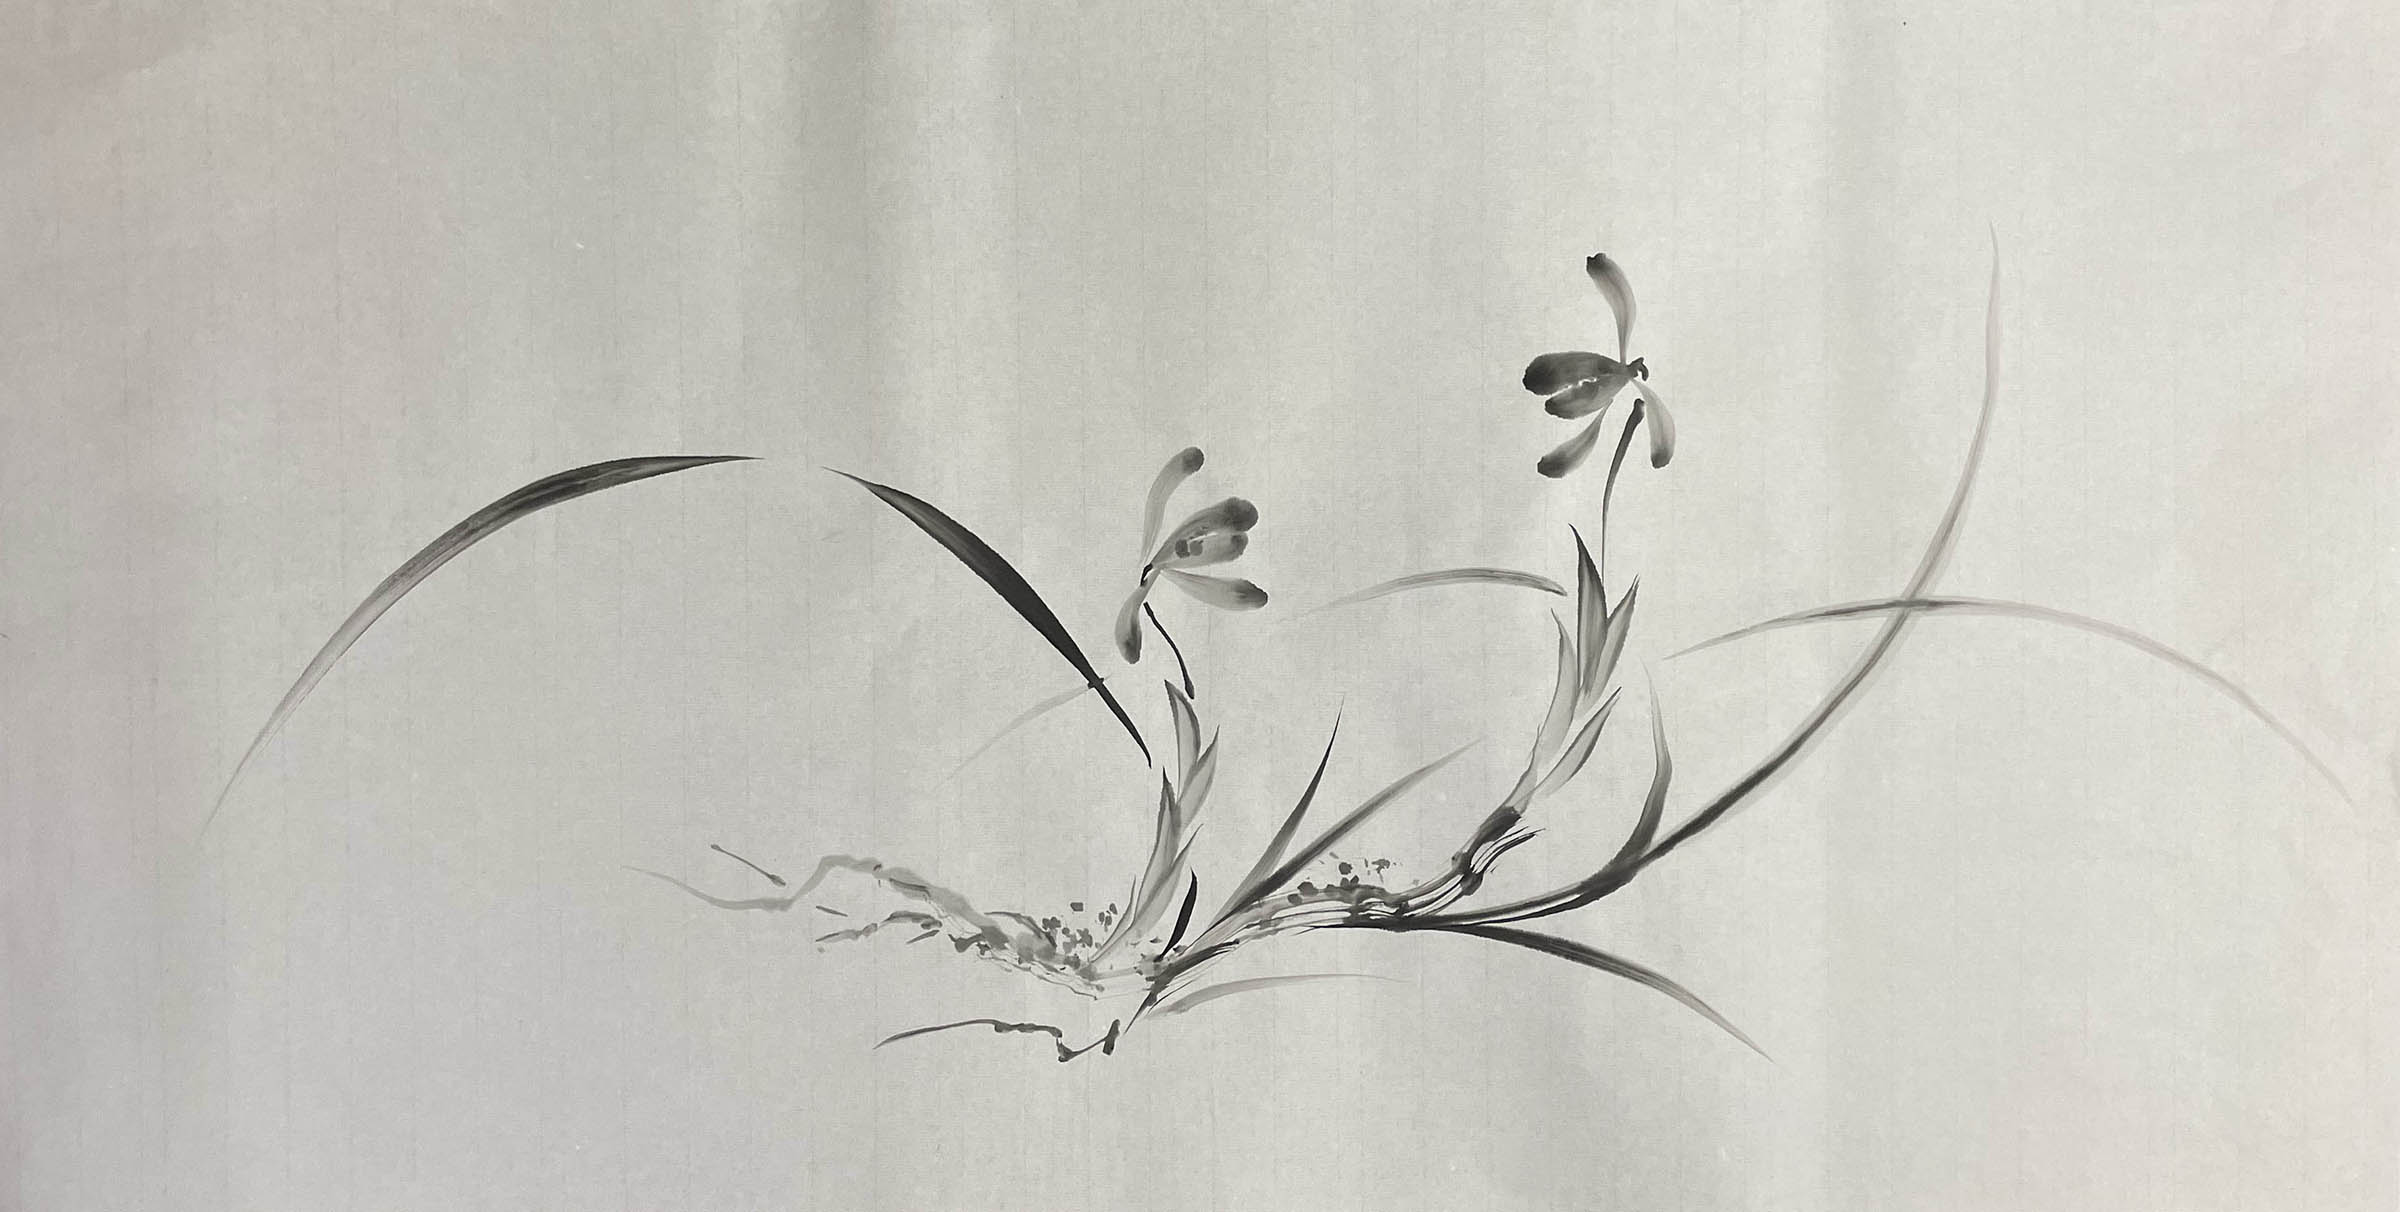
In sumi-e, an orchid is built in four stages — the leaves, the crossings between them, the flowers, and the base that holds it all to the ground. The hardest part comes first. An orchid leaf is a long, thin curve pulled in one breath, never stopped partway and never joined, and the thickness has to change inside that single stroke.
There is a second idea that matters just as much. Look closely at an orchid painting that works, and what holds your eye is often not the leaves themselves but the space between them, where one leaf crosses another. In this subject, the empty shapes do as much work as the ink.
Orchid is one of the Four Gentlemen (四君子), the four classic subjects of sumi-e alongside plum blossom, bamboo, and chrysanthemum. Where bamboo trains straight lines and pressure, orchid trains the long curve and the timing of your hand.
This guide walks through all four stages, alongside a video demonstration. For why the orchid was chosen as one of the Four Gentlemen and what it has come to represent, see the Four Gentlemen — this article stays with the brush.
How to Use This Guide | Watch the Video and Follow Along
A 100-second demonstration to see the whole sequence
The video below shows Tohun Kobayashi painting a single orchid from start to finish. It runs about a hundred seconds, published on the Kokusai Bokuyukai channel, so it is worth watching once straight through before you pick up a brush. At that length you can see the whole shape of the process without losing the thread.
If you have never painted in sumi-e before, Sumi-e for Beginners covers how to sit, how to hold the brush, and how to grind and dilute ink. For brushes, ink, and washi, see the essential tools guide.
What to watch for as the brush moves
Rather than trying to copy every movement, watch for four specific things:
- The angle of the brush when a leaf is drawn — how upright it stays
- Whether the movement comes from the wrist or from the whole arm
- Where along a single stroke the line becomes thickest, and where it thins away
- How much the pressure drops when the flowers go on, compared with the leaves
Once you have those in your eye, work through the sections below. The order is leaves, then crossings, then flowers, then the base. Leaves come first because they set the structure — if you place flowers early, there is nowhere left to run a leaf through.
Step 1 — Painting the Orchid Leaf | The Single Uninterrupted Stroke
Holding the brush upright and using the tip
Hold the brush vertically and paint with the tip. Orchid leaves are not laid down with the side of the brush the way a plum branch is; the tip does the work, and the brush stays close to upright throughout.
Then commit to one stroke per leaf. Do not stop halfway. Do not go back and extend a leaf that came out short — if it ends early, let it end there. A join always shows, and the line dies at exactly that point.
Before you start the stroke, decide where it ends. A line without a destination will hesitate somewhere in the middle, and hesitation is visible.
Changing thickness within one stroke
What makes an orchid leaf beautiful is that the width shifts as the stroke travels.
It enters light and narrow. It swells to its fullest somewhere in the middle. Then it tapers and lifts away at the end. You produce this by letting pressure build and release gradually, not by pressing down and spreading the hairs. Think of your weight shifting through the stroke rather than being applied to it.
A leaf of even width does not read as an orchid leaf. It reads as wire.
Keeping the speed up: why hesitation kills the line
Partway through a long stroke, most people slow down without meaning to. The line stalls, ink pools where the brush paused, and the momentum is gone.
The fix is to move your whole arm. If you try to pull a long curve from the wrist alone you will run out of range and lose speed near the end, every time. Work from the elbow and let the shoulder follow.
Of the three variables in brushwork — speed, pressure, and water — orchid leans hardest on speed and pressure. Both are covered in the brushwork practice drills if you want to work on them on their own before committing to a full painting.
Step 2 — Crossing the Leaves | Where the Composition Is Decided
The second leaf: change the length and the angle
With the first leaf down, the second one matters more than it looks.
The mistake to avoid is drawing it at the same length and the same angle as the first. Two parallel leaves stop being plants and start being pattern. Change the length, change how much it bends, change the direction it travels. The greater the difference, the more alive the pair looks.
The third leaf and the space it creates — hōgan (鳳眼)
Add a third leaf and the strokes begin to cross, enclosing a long narrow gap between them. The shape of that gap is what gives the painting its character.
Classically this enclosed space is called hōgan (鳳眼), literally the eye of the phoenix. You do not need the term to paint well, but it is useful as a reminder: when you place a leaf, you are also deciding the shape of the space you are about to create.
You cannot control that space while staring at the strokes. Watch the gaps between them instead.
Breaking the space with a fourth leaf — hahōgan (破鳳眼)
Once three leaves have set the structure, a fourth is drawn across the enclosed space to break it. Deliberately spoiling a shape that has become too neat keeps the painting from looking arranged. This is called hahōgan (破鳳眼) — breaking the phoenix eye.
There is no set number of leaves. But every leaf you add makes the picture busier, and fewer leaves are easier to resolve. When you are unsure, stop.
Step 3 — Painting the Flowers | Pale Ink, Light Touch
Petals in pale ink, placed and released
With the leaves finished, change how you use the brush entirely.
Dilute the ink until it is pale, and take the pressure out of your hand. The energy that went into the leaves is not wanted here. Place roughly five narrow petals radiating from a centre point, one at a time, lifting away immediately after each. Do not press and drag.
The dark dot at the heart of the flower
Pale petals on their own tend to sink into the paper. Put a small dot of dark ink at the centre of each flower.
That single dot gives the flower a focus and pulls the whole picture together. When a flower is lost among the leaves, it is usually because this dot is missing, or because the petals were mixed too dark to separate from the foliage behind them.
Why fewer flowers read better
It is tempting to keep adding flowers, but in an orchid painting the leaves are the subject. Every extra flower fills in the space you worked to create.
One or two blooms is usually enough, three at the most. Place them where the leaves are open and the paper is light, not where the foliage is dense — put a flower into a crowded area and neither the flower nor the leaves survive.
Step 4 — Gathering the Base | Anchoring the Plant to the Ground
Bringing every leaf back to one starting point
All the leaves should appear to rise from the same place. When the starting points scatter, the plant looks like it is floating rather than growing.
Decide on a narrow area for those starting points before you begin, and keep returning to it. This is the part that drifts wider as you work without your noticing.
Short dark strokes to close the base
To finish, lay a few short strokes of darker ink across the base of the plant. This is what creates contact with the ground.
They do not need to be long. A handful of short marks tightening the point where the leaves gather is enough to make the whole painting stand. Once the base is settled, the leaves you drew earlier start to read as a single plant rather than as separate strokes.
Orchid as a painting subject was developed in China and carried into Japan, where it has been painted ever since. The fact that the crossing of two leaves has its own name gives some idea of how long people have been looking closely at this particular plant.
Step 5 — Putting It All Together: Leaves → Crossings → Flowers → Base
Seen as a whole, the sequence runs:
- Leaves: brush upright, one uninterrupted stroke each. Light entering, fullest in the middle, tapering away. Do not lose speed
- Crossings: vary the second leaf in length and angle. Let the third create an enclosed space, then break it with a fourth
- Flowers: pale ink, light hand, a dark dot at the heart. Keep the number down
- Base: gather every starting point into one area and close it with short dark strokes
When the painting is finished, step back and look at it from a distance. Ask whether each space between the leaves has a different shape from the others. That single question tells you more about an orchid painting than anything else.
Frequently Asked Questions
My leaf stroke wobbles halfway through. What am I doing wrong?
Almost always, the speed dropped. A long stroke that hesitates stalls at that point, and the line dies there. Two things help. First, move your whole arm rather than your wrist — a wrist alone does not have the range for a long curve and will run out partway. Second, decide where the stroke ends before you begin it, because a line without a destination will waver. Speed and pressure are both covered in the brushwork practice drills.
How many leaves should I paint?
There is no set number. Three leaves will cross and enclose a space, and that is where the structure of the picture gets decided. Anything from the fourth leaf onward is there to cut across that space and break it. What matters more than the count is that no two leaves share the same length and angle — parallel leaves turn into pattern. If you are unsure whether to add another, don't.
My flowers disappear into the leaves. How do I fix that?
The tonal difference is too small. Mix the petals paler than the leaves, and put a dot of dark ink at the centre of each flower to give it a focus. Then look at placement: flowers sitting in a dense mass of foliage will always be lost. Move them to where the leaves open up and the paper is light.
Should I start with bamboo or orchid?
Either works, and it depends on which kind of movement you want to practise. Bamboo is about straight lines and changes in pressure; orchid is about long curves and controlling speed through a stroke. If you would rather build stability in a straight line first, start with bamboo. If the appeal is in pulling one long sweeping line, start here. The Four Gentlemen sets both in context.
What is hōgan (鳳眼)?
It is the name for the long narrow space enclosed when orchid leaves cross — literally the eye of the phoenix. A fourth leaf drawn across to break that space is called hahōgan (破鳳眼). The terms are not the point, and you can paint perfectly well without them. They are useful only as a way of remembering that when you place a leaf, you are shaping the space beside it as much as the stroke itself.
Continue Your Sumi-e Practice
Orchid teaches something that transfers to everything else in sumi-e: a long line has to be committed to before it is begun, and the empty areas of a painting are as deliberate as the marks.
If the single decisive stroke is what draws you, bamboo approaches the same discipline from the opposite direction, through straight lines and the pressure that creates nodes. To see how orchid sits alongside plum blossom, bamboo, and chrysanthemum — and why these four have been painted together for centuries — read the Four Gentlemen.
RelatedArticle

How to Paint a Sumi-e Landscape: Near, Middle and Far Distance in Ink

How to Paint Chrysanthemums in Sumi-e: Layered Petals, Leaves & Small Flowers
Hokusai's Daily Exorcisms: The Lions He Painted Almost Every Morning in His Eighties
Jin is a sumi-e artist and calligrapher whose practice brings Western calligraphy into dialogue with the Japanese tradition of ink painting. In Jin's work, letterforms, brushed lines, and ma — the resonant negative space at the heart of sumi-e — come together in compositions that speak across cultures. This East–West synthesis grounds an ongoing exploration of artistic possibilities that reach beyond cultural boundaries. Jin currently serves as a Director of the International Association of SUMI, and was recently honored with the Special Jury Award — the Arisumi Mitamura Prize — at Art Beyond Boundaries. Rooted in tradition yet attentive to the present, Jin continues to share a contemporary vision of sumi-e with audiences around the world.