How to Paint a Turnip in Sumi-e: The Boneless (Mokkotsu) Technique
Paint a turnip (kabu) in sumi-e step by step, with a demonstration video. The trick: don't paint the white bulb — leave it as negative space and suggest its roundness with a light-ink bleed.
2026.06.28
How to Paint a Turnip in Sumi-e: The Boneless (Mokkotsu) Technique
A turnip (kabu) is a friendly subject for sumi-e. Its shape is simple, and it gives you a perfect excuse to practise brushwork and ink tones. The tricky part is the round, white bulb — so let's start there.
The short answer: don't paint the white bulb
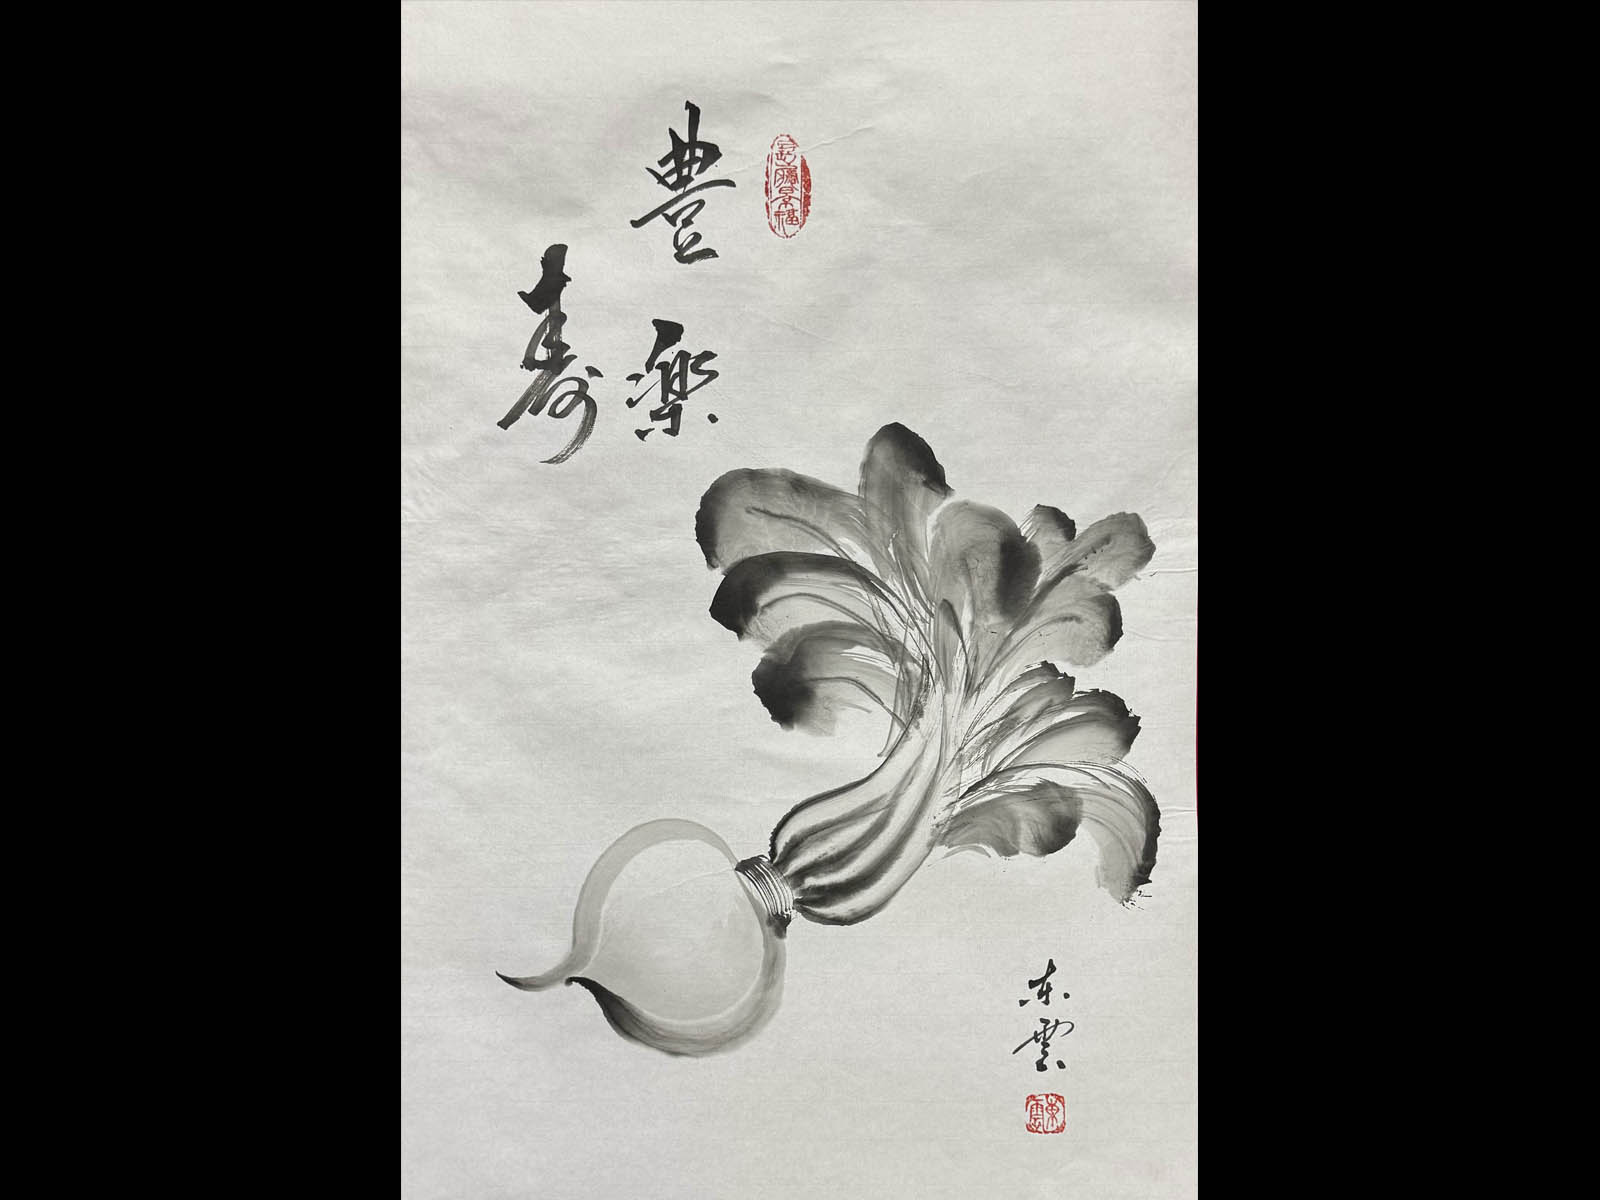
The single most useful idea is this: you do not paint the white part of the turnip. Instead, place a light-ink bleed along one side of the bulb and leave the rest of the paper untouched. That untouched paper — negative space — becomes the bright, round body of the turnip.
This is the boneless technique (mokkotsu), where form is shown by ink masses and tone rather than by outlines. The bulb stays pale; the leaves go darker. That contrast is what makes a turnip read as a turnip.
What you need (a minimal kit)
You do not need much to begin.
Brush: one brush that holds its point is enough. A fuller brush helps for the leaves.
Ink: liquid sumi ink is fine; mix tones with water.
Paper: use washi (an absorbent paper) so you can see the ink bleed.
Sumi-e uses ink in three tones — dark, medium and light (the three ink tones). Mix them in separate dishes before you start.
For a turnip, the roles are simple: the white bulb is light ink, and the leaves run from medium to dark. Preparing the three tones first means you never hesitate mid-stroke.
How to paint the turnip, step by step
Work in this order: bulb, then leaves, then roots, then finish.
Paint the bulb in a light-ink wash. Load light ink and touch it to one side of the round bulb. Leave the centre and the far side as bare paper. As the light ink bleeds, the roundness appears. Do not fill it in.
Paint the leaves in medium-to-dark bleeding ink. From the top of the bulb, run the leaves in one confident movement with medium ink, adding a little dark ink at the base for depth. Let the ink bleed; do not draw every vein.
Add the roots and whiskers in thin lines. With dark ink, add a few short, thin lines at the base. Keep them sparse.
Seal and balance the negative space. Step back, check that the bulb still reads as bright and the leaves are not too heavy, and add your seal.
Watch the brushwork in the video
Words can only go so far with bleeding ink and brush speed. Watch the hand move.
Three things to watch for: the pause as the brush is set down for the bulb, the way the light ink spreads into a round form, and the single, unhesitating sweep of the leaves.
The demonstration in this article is by Tōun-sensei (Kokusai Bokuyūkai).
Common mistakes and how to recover
Filling in the bulb. The most common mistake. If you paint across the white, the turnip goes flat. Next time, keep the ink to one side only and let the paper do the rest.
Leaves that go too dark. Too much dark ink and the light bulb loses its contrast. Lead with medium ink and add dark only at the base.
Ink that bleeds too far. The paper is too wet or your brush holds too much water. Touch the brush to scrap paper first to control the bleed.
For more on tones and bleeding, our explainer on sumi-e vs suibokuga is a good companion read.
Frequently Asked Questions
How do I paint the white part of the turnip?
You don't. Place a light-ink bleed along one side and leave the paper white (negative space) for the round body. Suggesting the form without painting it is the heart of the boneless technique.
What is the boneless (mokkotsu) technique?
It is painting form with ink masses and tone rather than with outlines (boneless technique). It contrasts with line drawing (hakubyō), and it suits a rounded shape like a turnip.
Which ink tone should the leaves be?
Medium to dark, letting the ink bleed, with a little dark ink at the base. The contrast with the light-ink bulb is what gives the turnip life. Don't overwork the veins.
Is a turnip hard for beginners?
Its simple shape makes it good practice. Keep two cues in mind: don't fill in the bulb, and don't over-darken the leaves.
A sumi-e turnip comes down to one idea: leave the white bulb unpainted and let a light-ink bleed and the bare paper do the work, while the leaves carry the darker tones. Mix your three tones, work bulb to leaves to roots, and watch the brush in the video. Then pick up your own brush and try a single turnip.
Jin
Sumi-e Artist
Jin is a sumi-e artist and calligrapher whose practice brings Western calligraphy into dialogue with the Japanese tradition of ink painting. In Jin's work, letterforms, brushed lines, and ma — the resonant negative space at the heart of sumi-e — come together in compositions that speak across cultures. This East–West synthesis grounds an ongoing exploration of artistic possibilities that reach beyond cultural boundaries. Jin currently serves as a Director of the International Association of SUMI, and was recently honored with the Special Jury Award — the Arisumi Mitamura Prize — at Art Beyond Boundaries. Rooted in tradition yet attentive to the present, Jin continues to share a contemporary vision of sumi-e with audiences around the world.